Wednesday 4 February 2009

Crashed!

One icy day Bumble came to an end. Engine is still fne but the fuel pump took a knock and it would be easier to just move onto a new van. I think I fancy a LWB next.

RIP Bumble ...

Thursday 28 June 2007

19" Audi RS8 Wheels & Blackened B Posts

I saw some 19" Audi RS8 Wheels going pretty cheaply with some clear rear indicators, so I decided i'd go for them.
I'm more than likely not going to keep the wheels, as nice as they are, permanently as the 235/35 low profile rubber won't be suitable for driving down old Welsh/Scottish lanes when I take her kayaking/climbing. That said they look great for just normal road use, providing you are aware of the kerbs :)
From the picture you will also notice I have blackened the door B Posts with some vinyl I bought from B&Q. Getting it on without any bubbles was a nightmare. I'd be interested in strategies to make this easier next time.

Wednesday 20 June 2007

Bumble was violated (broken into!)

I work in an ok area of the city (Birmingham) with what I thought to be a very safe school car park. It has a big secure perimeter, lots of people walking about the front, loads of large windows facing the front and CCTV coverage. How wrong was I. How annoyed am I!
I NEVER leave stuff in my van but the one day I did, someone clocked me and made their move. I came out to grab the laptop hidden under a blanket at lunch time for the very reason of theft prevention. It seems someone parked behind my van, smashed an out of view window (despite being clearly visible to the main road) and hopped in to unload everything. Someone in work saw this dude ducking about but thought nothing of it at the time! He was caught on CCTV but the police said unless there was blood or an ID card saying who it was that "it wasn't worth coming out to see!" Fooooooooooooooooooooooook!
I lost a Laptop, Vehicle MP3 player and the thing that 'really' made it an issue ... every item of Climbing Kit I have ever owned since the age of 16. Why he took this is a mystery - it's worth nothing to anyone but me. Gutted.

Tuesday 29 May 2007

Side windows finished

It stopped raining today, so I finished off the windows and they look great :) It didn't take long to do as I just needed to finish painting the edges and open the Carbond glue. If anyone is wondering how to do it, I just used a screwdriver to pop the end off and then threw the tiny balls away (which I presume absorb moisture in storage). Once I was ready to go I slipped the window edges on, ensuring the join was on the far side and near the top. I then used super glue to join the two edges together.
Next was the bonding stage, so I cut a V into the Carbond nozzle. I then applied it as a continuous triangular band about 1mm from the trim. Once completed I quickly offered the window to the gap I had cut, whilst trying to get it straight first time. I then used my kayaking roof rack straps (which I had sorted prior) and some household objects to hold the corners in place to cure. I think it should be ok to drive in 4hrs but i'm going to leave it overnight just to be sure.

Clear Indicators
I also swapped the orange indicator lights with clear ones as they arrived today. They took about 1 minute to complete. The old ones pop out with a screwdriver and the new ones slide in. As they are clear I had to also swap the bulbs from clear to orange. These and the side windows make a massive difference to the van!

Sunday 27 May 2007

Side window prepared

I had a go at the sliding door window today, despite knowing it might rain later in the day. I managed to cut the hole and prep it before I was forced to cover it with a thick plastic sheet to stop it getting wet.

I used the inner skin of the door as a guide to drill holes in the outer skin (see picture). For some reason each hole caused a burring, which although fine due to me cutting it out anyway, has suggested I should use a smaller/softer drill bit in the future. I then used all the outsides of the holes to draw a cutting template. The more holes in the corners = the more accurate I could get them to be.

I then used my trusty jigsaw to cut around the template. I had planed on doing the straight bits from inside the van but the footprint on the jigsaw was too large to enable me to do this. I tried removing the jigsaws footprint too but it was too dangerous to continue to cut this way. So after masking the edges and footprint, I cut the hole from outside the van. I had wanted to cut from the inside as I have learnt that to get the windows flush, the outer skin needed to be slightly shorter than the existing inner skin to enable you to dress it back later. Something which would be easy to do by angling the blade whilst cutting inside. The plan B was to cut the hole from outside the van and 'angle grind' the outer skin back. This went ok but did take a while to angle grind back. The abandoned plan C was to cut the hole an inch too small, then go around it again with an angled blade. I didn't opt for this option as I was worried about the metal drumming and bending with no support.

I then used a hammer (and spanner) to dress back the edges to about a parallel 4mm gap between the skins, being very careful on the corners. The gap was then filed with the Sikaflex I had left from the sunroof and clamped into place until dry. Once dry I painted it with red oxide and white Hammerite paint to seal and prevent rust. All I need now is a dryer day to get the window in and ensure it sets properly.

Sunday 6 May 2007

Speakers in dash upgraded

I bought some 4" speakers from Macro recently and fitted them in.
It's a simple thing to do. Just pop out the grey cover with a screwdriver, then pop out the speaker.
I had to change the wire plugs to fit the new ones but this was easily done by attaching x2 spades to the cut wires. I used the x3 original clips to then refit and hold it tight in place. I may change the wire to the head/amp at a later date, as i'm told this can make a 'massive' difference too.

(Old on left and new on right)


Truth be told the original VW ones are pretty good but I wanted something a bit better/modern in the front. I'm very impressed a 4" speaker can sound so good.

Sunday 29 April 2007

Tinting side windows

I picked up some windows from VAG to go into the side panels and thought it would be easier to tint them before they go in. I bought some recommended tint from an online shop called www.wtfuk.com as it looked to have a good value/performance ratio.
I then did a bit of research and watched this clip a hundred times before starting and it was still hard as nails to get right. This takes ALOT of practice to get it dust free, bubble free and straight.
After 3 of us (including an arty lady for that female touch!) working a long time in my bathroom we managed to get the two windows to a pretty good standard but the test of time will tell. I had planned on actually bonding at least one window in today but tinting took ages.

Saturday 14 April 2007

1st Sunroof installed

I bought a Peugot 106 sunroof from 1st Choice Vehicle Dismantlers in Tremorfa Ind Est, Cardiff for £20.

I saw quite a few but only wanted the tinted glass version and they only had one available. As it turned out the item was very easy to remove and I used the hole left to make a template at the breakers.

Installation required removing the plastic/overlay and cutting the jigsaw hole by using the template I previously made. I stopped the drumming by taping the bottom of the jigsaw and the edges of the hole as I cut.
The template didn't work out as planned, so I had to use the metal frame to redraw and cut a little extra. I didn't get the flush fit I was looking for by doing this but as I intended to seal it with Sikaflex this didn't concern me. I was pretty sure it would be leak proof with a generous amount of Sika on the rim.


With leaks in mind, I then perhaps put too much Sika on the rim and had trouble scrapping it off the exposed paintwork.
Reinstalling the headlining was easy enough by using a stanley to cut it to shape and remount the 106 covering. Looks great!

I fully intend to install another (when I find a tinted one) in the back and have learnt some good tricks. I'm sure the next one will be easy to mount with the knowledge and skills I have learnt.

Sunday 18 February 2007

Head Gaskget

After getting back from the Alps a strange water leak problem popped up. It never got worse or better, so I could have left it and refilled often but I wanted peace of mind before it got worse.
Some simple fixes I tried before going further were:
1. Trying a new cap - as it might be releasing less than 1bar.
2. Remove the thermostat.
3. A pourus radiator.
4. Air in the system - so filled it up by the rad.
5. Back flushed the radiator.
6. Pressure tested the entire system and looks for leaks. These may be drawing in air.

After a bit of investigation it turned out to be the dreaded head gasket. To explain in more detail, the water was building up a pressure into the coolant system slowly as I drove. When it reached 1bar, the limit on the cap, it blew about a litre out the back of the tank.
A diagnoses I easily reached by taking the cap off > replacing it > then holding the main coolant hose and revving the engine from the bonnet area. I could feel the pressure build up my hand but didn't see it blow out the cap (which it did after about 30mins of driving). There was also small bubbles coming through into the reservoir. I certainly couldn't afford a dealer to do it and most garages said no chance when I mentioned the problem.

I've never done a cambelt before (brakes and oil pumps were my previous best!) but was willing to try, so I bought a Brookes workshop manual and did as much research as I could.
I got some morale support from a friend who is mechanically minded (the picture says it all) and off I went:

Some things I learnt along the way:
- Plan to get it skimmed 'well' in advance. It's not always the 1/2 day job they tell you!
-Leave the lower cambelt cover on if you can. The belt can the manoeuvred out.
-Mark the cam belt pullies with tipex for peace of mind. If you leave the drill bit in the injection pump not a lot can go wrong. PM me if you need to know how to find the flywheel mark. ]
- Check the weather before starting. I did it on my mothers drive and after horizontal rain had to go to B&Q to buy a plastic sheet (£2), aka roof.
- Hit the dampener pulley off with a piece of wood and a hammer if it's stuck.
- Clean (and I mean clean) all the edges with a scalpel blade until spotless.
- Take photos of all the electrical connections. I forgot where some went after a week and had to resolve problems with earths and immobilisers going off.
- Leave all the injectors loose when trying to start it and do them up when it does to bleed air out.

I can write loads on this but as they say .. a picture says a thousand words:

Thursday 21 December 2006

Bulkhead removed

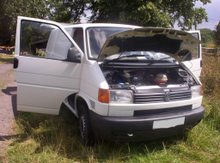
Today I bought an angle grinder from B&Q and set upon taking out my bulkhead and thus make a bit more room in the van for swivel seats. It didn't come out as clean as I hoped but as I just wanted it out .. out it came. The hot sparks became a serious issue as they went everywhere at speed. I have even heard of them chipping the windscreen whilst doing this job.
On reflection I would use a spot weld drill bit to do it neater.
After it came out and I grinded everything back neatly, I then used red oxide to prevent rusting and white Hammerite paint to finish it off.

Monday 20 November 2006

Insulation in walls


I bought some rock wool from B&Q (£20 a roll) and thick gauge plastic (£20) to use as a vapour barrier. I had already painted the entire van in Thompsons Roof Seal to prevent rust if I got my kayak stuff in there.

It was simple enough to install but takes time. I had looked at other options but most were too expensive or unavailable at the time. B&Q sold some lovely silver bubble wrap stuff that I would have possibly used instead if it wasn't £30 a roll and I needed two of them.

Friday 4 August 2006

Gear selector problem


My dad jumped into the van for his first drive in a VW T4 and the gears broke! Upon inspection it seems the previous owner/garage had bodged a repair on the gear selector, as this is a common thing to go on T4's.

I went from Cardiff to Bristol to get the part as ALL the local dealers/scrapyards didn't have it. Cardiff said it was 10-days wait from Germany. So I paid £20 to the stealership for what appears to be a small bit of metal with a plastic ball-joint in it! I had no other choice, I as going to France in two days.

I then proceeded to TRY to fit the 'ball' shown on the picture into 'shoulder' on the new £20 part. JESUS what a job it was! I have done things on cars in the past and this topped them all in frustration. No matter what I tried to do they just would not fit together. I tried clamps, levers (which may have bent the attached part), hammers, etc, to no avail. The amount of force required to get it to go in was insane.

In the end me and a friend (who came over on 'day 2' to help) took the entire gear stick off, took it to a local garage, asked to use their heavy duty vice and with the correct angle/force it took a matter of seconds to pop in.
The weird thing was, I previously asked a VW mechanic how he did one a few weeks ago, and he said "it was a bitch of a job but I just levered it off the engine block with a metal bar". My effort with a shovel didn't come close and eventually broke a T-section on the water reservoir. How the hell he did this and avoided major damage is a mystery. Someone must be driving about with a damaged/broken gear selectors or he was VERY lucky.

Morale of the ordeal: 1> It is better to fix stuff yourself if you have the time, as a mechanic will probably fook it more. 2> Whenever doing stuff on vehicles it is easier to take the thing to pieces in the long run.
There are no short cuts.